List Building: Activation Count and Control

Strategy

Image result for spam


Short piece here, since I’m in Aruba and have some time to kill….and of course miss Legion and the community because I’m just an obsessed adult child. I figured a good quick topic would be about activation counts and why they matter. Even in a casual game it’s going to matter, so this fits in the casual and the competitive aspect of the game. I think as you start to dive into the game more and more you notice something about every list you build: Corps units and Strike Teams. There’s reasons for that: cheap activations and effectiveness. Sure there are cheap units like the FD Laser Canon and E-Web, as an example, but they’re useless in some of the game modes when it comes to objectives. So is it more useful to bring more Stormtrooper units or three E-Webs? Stormtroopers, all the way, because they can interact with all objectives as opposed to the E-Web. In a standard 800 point game of Legion, I want to say right now the activation count is anywhere from 9 to 11, I know some 12 activation lists are out there but they’re not common. I know Jay over at the Fifth Trooper has quite the interesting 12 activation Imperial list, if I’m not mistaken. When the Clone Era stuff drops, the droids are going to be quite the interesting list build. They’re going to come at you in hoards, and man is that going to look so cool on the table! Here are some faction specific things in terms of where you want to be with an activation count and list building.

Rebels

Competitively speaking, again all from an 800 point game perspective, Rebels want to be at least 10 activations from my experience. Any time I have gone below 10 activations, it doesn’t feel right. Especially if your opponent has 10 activations and you have 9, you’re starting the game in an uphill battle if you ask me. Especially with them dang white saves. Let’s say your opponent Maximum Firepowers a Sniper Strike Team, as an example, you’re now down two activations in the very start of the game. Here’s why that matters: your opponent is always going to have control versus you when it comes to the numbers game. Let’s say you don’t kill any of his units before round 1 ends and you enter round 2 at 10 activations/8 activations, do you feel comfortable with your opponent having two full activations more than you? Let’s say you activate all 8 of your activations, and your opponent still sits at 10….they will have 2 full activations with a total of 4 more actions to do while you just sit at the table twiddling your thumbs. It’s just the way it is with wargaming, from what I understand because this is my first ever wargame. Activation counts will always have some sort of play in the game. As much as you want to beef out units, and bring all sorts of upgrades, unless something drastic changes (like some sort of activation count cap, which would never occur) this is what you’re looking at. Unfortunately, for the Rebels, the most efficient list right now is just your typical Luke/Leia/five z6/triple snipers….which is very vanilla/boring, but it does what it needs to do. Hopefully with the Rebel Veterans, Taun Tauns and Sabine Wren coming the Rebels can kind of have some variety, competitively speaking. The Death Troopers and Bossk, coming soon, really put a damper on Rebel list building if you ask me. You need pierce and ways to deal with suppression. What’s the best/easiest way to do both of those? The twins.

Empire

The Empire has a little more wiggle room than the Rebels do, and a lot of that has to do with activation count, and what I mean by that is that they can be at 9 activations and still feel comfortable as opposed to the Rebels. A lot of that has to do with the red saves. The scary part of this, though, is that it’s still not hard for the Empire to get to 10 activations. Especially with some new, cheaper commanders in the Imperial Officer and Krennic. Sure the DeathTroopers are expensive and all, but I’m sure you can find a way to get to 10 acts with them in there. And man, are those DeathTroopers good. Again, you’re going to see a lot of list building change in the upcoming months with the new Shoretroopers, Dewbacks, and Bossk. Not to mention, it’s already having some shift right now with the tank, which seems to be the best vehicle in the game at the moment. Even with the tank being somewhat pricey, I’m still seeing the Imperials find a way to that crucial 10 activation count. Unless you want to run double tanks….then I’m not too sure what kind of activation number you’re realistically looking at. In the Invader League I have seen some double bounty lists, which is Boba/Bossk, and it’s either with Veers or the generic Imperial officer…and you say all of this to yourself and think: no way that’s going to be a ten activation list, but jokes on you because it is. As a Rebel player, it’s pretty scary to look at! It’s going to be pretty interesting to see where the competitive Imperial meta is going to go in the upcoming months. I’m not saying that the recent units for the Rebels aren’t good (Jyn, Pathfinders, Landspeeder) but I think the Imperials have better units in Krennic, Deathtroopers and the tank. Especially with the fact that they still find their way to the 10 activation count. And let’s say a Palpatine list hovers at 8 or 9 activations (most likely 9), you need to factor in Pull the Strings. That alone can make up for a smaller activation list, because your going to give some unit an extra action each round. Hint: It’s going to work really well with some range 4 lizard with a suppressive weapon.

Final Notes

There’s so many factors when building a list and the variety is truly there. I’m not saying you need to run Wonder Twins every single game to be competitive, because you don’t. I’m also not saying you NEED 10 activations to win or be competitive, because you don’t. However, it is something that definitely can define a game especially early on. Remember, this game is objectives based. You want to be able to get those objectives done and how do you do that? Have units on the board.

Another factor in building a list is to have a good token mix. That’s a bit of a tricky one for me to explain but here’s an example: Luke/Leia/5 Corps/3 snipers has a pretty good token core. More often than not you’re giving Luke and Leia their tokens in the command phase. Now your bag/stack has 5 corps and 3 special forces in there and that’s typically great variety, because you kind of have an idea of what you’re going to pull and most of the time it won’t matter which of the two you pull. Not to mention, you have full activation control over Luke and Leia. The inverse of that would be like…Luke/Leia/4 Corps/2 Snipers/FD Cannon/Landspeeder…this would mean you have 4 corps, 2 special forces, 1 heavy and 1 support token in your bag or stack. (barring any kind of comms upgrade) If this is the case, you might start pulling tokens you don’t want early or late in a round. It can really throw a wrench into your plans. Activation count matters, of course, but so does the variety in what you bring with those activations.

At the end of the day, all my rambling on really means one thing: Don’t bring a low activation list (right now) and expect it to thrive. I’m not saying it’s impossible, but if your opponent severely out activates you: it’s going to be a long, long game and a lot of idle sitting for you. Remember, you only have 12 actions per game with units. Even less when you factor in suppression. Is a list with 84 actions going to be as efficient as a list with 120 actions? My educated guess and gut are telling me no and yours should, too. In a few months, we could see the game shift to a 8 to 9 activation game with more expensive but really efficient units, but for now it seems like anywhere in 9 to 11 range is where you want to be on either side. When the Clones and Droids show up on the scene, then we could see a drastic change overall! I said this was going to be a short piece, but I guess sitting in the hotel room with a sleeping son and fiance opened up the floodgates!

May the Force be with You!

-GrandAdmiralThrawn

Cohesion as a Beginner

Strategy

No, this isn’t a post about super gluing your fingers together, but we have all done that! I know it!

Cohesion is one of the most important things in the game when it comes to tactics. Especially if you want to play the game competitively and start playing more experienced players. They’ll take advantage of any simple mistake you make and the simplest mistake you can make comes with cohesion. Below I will reference the Star Wars Legion Rules Reference Guide, which you don’t receive in the Core set. The reason for that is the RRG is a living document! It’s being constantly updated by FFG online, which is great for the game in my opinion. Sure, it’s nice to have a hard copy of things, but that means the one you got in the Core set is now outdated by the new one. So on and so forth. A living rules document keeps this game constantly evolving.

There are a few little quirky things about cohesion, but the best way to think about is shown in that picture above. Just imagine the circle around your unit leader as such, use the speed 1 tool all around him if you need it to help visualize, and weigh your options.

Now, tactically speaking, let’s discuss some do’s and do not’s of cohesion, especially playing against more experienced players. The first rule of thumb, which can sometimes be broken situation depending, is that you never cohere your troopers ahead of your unit leader. (A situation this may not be true is if you move them ahead to completely obscure them from view.) The reason being for this is that if you move them ahead of your unit leader, your opponent has access to a shot much easier to that unit. Remember, range is going to be measured leader to miniature not leader to leader. So, as an example, let’s say you move and dodge with a Rebel trooper unit because you moved and measured from your unit leader and you were just outside of range 3 on an opponents unit, but decided to cohere your troopers forward, your opponent can move their unit leader to range 3 of your most forward trooper and take a shot at that unit. That’s extremely dangerous and it will allow your opponent to start taking advantage of you. You don’t want to give your opponent any competitive edge, especially one where you let them take easier shots on you.

The next trick you need to keep in mind is always keep your heavy weapon in a safe position. There’s a lot of different ways your heavy can get “sniped” and I don’t mean by actual snipers. I’ve seen it referred to as terrain scoping, and you need to try your best from letting it happen. The best way to do this is to make sure you heavy weapon is in the middle of your cohesion, that way your opponent can’t take a shot at your unit and only be able to see the heavy weapon. Because, let’s say you cohere your heavy weapon around the side of the building thinking you kept it obscure, and he’s all alone. However, your opponent can get an angle on that trooper and ONLY that trooper, then that’s the only trooper that can go down by the shot. Protect those DLT’s and Z-6 troopers by keeping them close to the unit leader. This also reigns true for medical droids and astromech droids.

Speaking of getting a shot on only a certain trooper, here’s a few things you want to keep in mind with that situation. The leader is ALWAYS the last miniature removed from a unit. So let’s say your unit leader is all your opponent can see, if he goes down, he moves and replaces a trooper in your unit. After the unit leader, droids are removed second to last if they are in your unit, because they are a non-combatant. For the most part, however, if you aren’t running any droids you want to keep those heavy weapons on the board at all costs. They’re typically the second to last trooper you remove from a trooper unit.

Now of course, the best use of cohesion is to make sure your unit’s are in some sort of cover. There are a couple of things to keep in mind:

  • Half (or more) of you troopers need to be behind or in cover to gain the light or heavy cover
  • If you cohere into difficult terrain in order to gain cover but your unit leader is not in the cover itself, you still only gain a one speed move
  • As noted above in the picture, it always has to be a legal one speed move

When you first start out, you’ll keep your units  bunched. I know I did that, and still do that for the most part. But now that I have started playing a little more competitively, it’s better keep your guys behind the cover but somewhat spread out. More experienced wargamers/players will find ways to thread the needle and take your cover away from you, and you don’t want that. Especially as a Rebel player. I’ve had games where I’ve been super cautious with my cohesion and cover only to have that blown up by a more experience player. That’s why you play more experienced players, though. It’s a great learning experience. Playing better players will typically result in a loss, but it helps you learn the game more and become a better player yourself, I promise.


May the Force be with You!

-GrandAdmiralThrawn

Unit Upgrades

Unit Upgrades

Image result for upgrade button

Now that we’re through talking about all of the units in the game, I mentioned a lot of upgrades that weren’t necessarily shown or talked about enough. In Legion, there are plenty of Unit Upgrades you can take, they are as follows:

  • Heavy Weapon
  • Personnel
  • Force User
  • Command
  • Training
  • Comms
  • Gear
  • Grenade
  • Armament

We won’t go over certain things like Heavy Weapons, Personnel and Armament slots because those are in the Unit posts, but let’s take a deeper look into the other upgrade cards. Who can benefit from them? What’s maybe over-costed? If you have the extra points, where do they go? Let’s find out.

Force User Upgrades

The very obvious choice to start with here is Force Push. Arguably the most used card in the game because, quite frankly, it might be the best card in the entire game of Legion. To the point that it might be under-costed, according to some. Either way, for 10 points it allows a Force capable unit to choose an enemy unit at range 1, perform a speed 1 move with that unit, even if it is engaged. It is exhaustible, which is more important for Luke because he does not have Master of the Force like Vader and Palpatine. Force Push has a MULTITUDE of uses. It’s main use is to trigger Charge for Luke and Relentless for Vader. That said, you can use it to move units from cover into the open for your other units to shoot. You can maybe take a unit that engaged a unit you don’t want to have to just withdraw with. There are many clever ways to use Force Push! Remember, the little double arrow on the card means this is a free action. 

From what I understand, this was actually a very useful card when the game first came out, now I don’t think it get’s used much. Virtually you can put HQ Uplink (see below) on a unit for the same price, albeit exhaustible.

Force Reflexes is…not to say expensive for what it does, because it is important to say Vader, but it is 15 points and exhaustible. Vader and Palpatine, again, don’t care too much because of Master of the Force, but for Luke I have yet to justify taking it because of it’s exhaust. I’m going to want to use Force Push with Luke and he has other ways to get dodges.

At first glance you may say “let’s throw this on Luke” but keep in mind that Luke’s blaster is two red, pierce two. It’s not worth the 10 points on him. That said, it’s absolutely worth the 10 points on Vader. The problem with Vader is his one speed as opposed to Luke’s two speed/Jump 1. Vader will take time getting to units, but with Saber Throw and three red dice, pierce 3, he can just mow down opponents on his way into the fray.

Force Choke is Dark Side Only, of course, and exhaustible. For 5 points, you basically auto kill a trooper mini at range 1. This is especially good, because you can pick the heavy weapon unit of that trooper unit and take them off the board. That’s ever so important. The main issue about Force Choke is that you’re most likely bringing Force Push/Reflexes/Saber Throw with Vader, which gets expensive fast and not to mention uses all of his Force User slots. I could see a case for not using Force Push and bringing Force Choke, it’s all preference!

Another Dark Side Only card, rightfully so (man this game is so thematic!), which in my personal opinion is an auto include on Palpatine. It perfectly coincides with his “And Now You Will Die” Command Card and it’s only 5 points.


Gear Slot Upgrades

Targeting Scopes is a card that in theory is pretty good, especially for Rebel armies, but is simply over-costed. At 6 points, I don’t see it being taken too often on either side. I think if it cost a little bit less, you might see it played more, but competitively I have yet to see someone use it. I did see someone mention some synergy with Hunter, but that’s a lot of points for aim tokens!

Grappling Hooks are useful, but very situational. I could see that if you have the extra points laying around to put them on Sniper units, perhaps. Keep in mind, this is something you’ll see referred to as a “Luxury item”.

Environmental Gear is also a good, useful upgrade but very situational. It will depend on the boards you are playing, how much difficult terrain do you typically see or expect? A personal favorite to put these on are the Fleet Troopers. They want to be up against barricades and terrain to keep shots at them tempered down with heavy cover. Doing that, however, means they’ll need to take a speed 1 move to hop the barricade…unless you put “E-Gear” on them! Viola, you got yourself some barricade hopping Fleet Troopers! Scatter Gun coming in!

Saved the best two upgrades for last. Emergency Stims are absolutely integral to most list building. You’ll want to put them on Luke, Boba, Han, Bossk, Sabine…pretty much on most heroes/Bounty hunters that can take them. Note: Vader and Palpatine don’t have gear upgrade slots. Keeping a unit alive to its next activation is extremely important.

Recon Intel

Recon Intel only costs 2 points, which is super cheap, and it’s also super useful. Giving your capable unit a speed 1 move at deployment can get you up the field early, and keep it mind it does stack. So let’s say you get Advanced Positions and maybe you decided to put this on Luke: speed 2 move. For an example. It’s probably the best value out of any card not named Force Push.


Training Upgrades

Tenacity

If you’re bringing a melee unit with multiwounds, Tenacity is a great card for 4 points. If you take a wound, which you most likely will on your approach, you gain a red die in your attack pool. This is great on Wookies, Royal Guard, and perhaps Sabine with Darksaber.

Hunter

Hunter is also targeted towards multi-wound units,  but in the opposite way. The wording on the card is a little subject, but you can’t gain an aim shooting at say Rebel Troopers who lost a trooper. But more so lets say you shot the Wookies before and they took a wound, Hunter can now trigger. For 6 points, it can be useful on a unit like Chewbacca, Boba or say Bossk. There has been a lot of chatter about Hunter on snipers, as well.

Duck and Cover

Duck and Cover is a little expensive…maybe? Hard to say really, but this is good for unit’s that maybe you find yourself in light cover often and want to get up to heavy cover. It’s basically an auto-include on the Pathfinders and Jyn. Just staple this to their card, because of Danger Sense.

Overwatch

Speaking of stapling cards to things, might as well staple this to the shiny, new Death Troopers for a plethora of reasons. Standby tokens give them a free aim and now it’s range 1 to 3. It’s a good, cheap option for units with a free gear upgrade slot.

Command Slot Upgrades

Improvised Orders

Not going to lie, this is a crutch card for me. Every list I build, I always put it in. It’s exhaustible, but it readies back up at the end phase of each round. So essentially once per round you can go back to your stack or bag if you don’t like the token you pulled and try again. Then re-shuffle the token you didn’t use back in. The best use of course is if you need something to go right away and don’t pull it, try it again. Or perhaps something you want to go later comes up first, “Improv” it. For 10 points it’s worth every bit.

Commanding Presence

Can’t say I have ever used this in list building. I mean, it’s similar to Battle Meditation where it’s better to put HQ Uplink on a unit rather than this on a Commander.

Esteemed Leader

This is almost essential on Palpatine, and you may well consider it on white save heroes such as Leia/Han. Letting trooper unit’s take some wounds off of you can be critical to your survival. Not to mention it’s only 5 points!


Strict Orders

A new card that came out with Jyn and Krennic, I think, that is extremely strong for only 5 points. Basically an automatic rally on any trooper unit with face up token….which is way better than rolling them white dice!!!


Grenade Slot Upgrades

Fragmentation Grenades

A common use for Frag Grenades is on snows. Giving your unit surge to crit with red dice, especially a unit that you want to get in your opponents face, is very strong. All grenades cost 5 points, but give you three options.

Impact Grenades

If vehicles do start to become relevant, then you might see Impact Grenades a little more often. I could see these being thrown on some Fleet Troopers or something to be somewhat of a Vehicle deterrent.

Concussion Grenades

I also like Concussion Grenades on Fleets. Eliminating cover with a strong dice pool is very good. You can toss two black, six white, two red with officer Fleets with Blast and Pierce 1. As you can see with grenades, they really fit best on units that you know need to advance into close quarters.


Comms Upgrades

HQ Uplink

I want to say, from my experience, this is the most commonly used Comms Upgrade. It’s exhaustible, which kind of stinks, but it gives you activation control when you decide you need it. I think it’s great on units like the Pathfinders, perhaps Speeder Bikes, Taun Tauns and the Landspeeder can make some use of it. For 10 points, it’s not that bad.

Comms Jammer

I think in theory, this card is okay. However, for 15 points I don’t see much use for it. I think if it cost 5 points it would see more play? Not entirely sure. I’m not much of a comms guy anyways.

Long-Range Comlink

This is similar to HQ Uplink, and it’s not exhaustible, however it doesn’t work the same. Here’s an example: Let’s say you play My Ally is the Force, which is two troopers, and you have this on the Pathfinders. Luke and the Pathfinders get tokens and a dodge. However, if you had Uplink on them, it can be Luke, another trooper, the Pathfinders and they all get dodges. HQ Uplink is the better play for the same cost.

Comms Relay

This is the card that was going to take Coordinated Fire over the top! For 5 points, it certainly has it’s use, especially if you want that “Aim Chain”. Passing off activation tokens can change a lot in a game, especially if free tokens are being tossed around.


Final Thoughts

Well, that’s a lot to take in. I hope I broke it down alright for everyone and simple enough. Really, upgrade cards come down to how you play the game and build your lists. That’s what so great about this game, it has so much variety. Nothing is stale. There are some unused cards, sure, but that’s going to happen in any game. Enjoy the fact that there’s use for mostly everything! I’m leaving for vacation next week, going to Aruba so hopefully Krennic doesn’t Annihilation Looms me, so I might not be on schedule the next week or two but I promise to get back on track when I can!

May the Force be with You!

-Grand Admiral Thrawn


Imperial Support and Heavy Units as a Beginner

Imperial Analysis

Image result for atst logs gif

We’re here, at the end of the Imperial road. Combining the Support and Heavy units together gives us plenty to talk about, so let’s get on with it!! I’m even going to go over the tank since we have all of the information on it!


74-Z Speeder Bikes

74-Z Speeder Bikes

The support unit from the core set still sees some use, but maybe not as much as they used to. I don’t think they’re a bad unit by any means, but when building an Imperial list, 90 points can come at a premium. Let’s go over what the Bikes bring to the table on the face of things. First of all, they’re a speed 3 Repulsor Vehicle with Speeder 1 as a keyword. What this means is that the Speeder can ignore terrain that is height 1 or lower, and it must perform a compulsory move. Notice the wording on the card, it doesn’t say “may” which means it is a mandatory compulsory move. You need to consider every move you make with them, because you don’t want to crash into bigger pieces of terrain, run off the board, or displace your troopers if you were to finish your move on them. They do have Cover 1 which is pretty good, and gives them automatic light cover. They have a health pool of 3, per bike, and they can’t be suppressed and they can’t be engaged. They roll white on defense, with a surge. On offense, they roll the rainbow dice with Impact 1 and Fixed: Front (meaning the shot needs to be from the front arc) and they surge to hit. Ultimately, they’re a great flanking unit if they are run in a list. However, I think you need to run them in pairs at the minimum. They are only allowed a Comm upgrade in which you should most likely consider HQ Uplink, I think.


E-Web Heavy Blaster Team

E-Web Heavy Blaster Team

The E-Web has a lot of keywords on it that we should go over and we’ll start with Cumbersome because it’s on the back of the card not shown. Cumbersome states “You cannot use this weapon and move, except for pivoting, during the same activation. This essentially nerfs the E-Web a little bit, because if it could move and use the Heavy Blaster weapon it would be maybe too strong. Full Pivot allows you to pivot up to 360 degrees, Plodding only allows you to move once per activation, Reposition gives you a free pivot action, and Sentinel bumps your standby range to 1 to 3. Some It has a health pool of 4 and a suppression threshold of 2. It rolls red dice on defense, with no surge, similar to Stormtroopers of course. On offense, it rolls one red, two black, two white at range 1 to 3. They do have the E-11 blasters, which coincides with Cumbersome, meaning that if you move you can’t shoot the E-Web…but you can shoot the E-11 blasters, if you wanted to, and all of the weapons surge to hit. I would personally add the Barrage Generator to add two more white dice and suppressive into the dice pool. One red, two black, four white with suppressive at range 3 is pretty solid. At a base cost of 55 points, 65 if you bring barrage, E-webs can give the Imperials a cheap support option.


AT-ST

AT-ST

Ah, the AT-ST….A much talked about Imperial unit. It’s slightly over costed at a base of 195, especially when you start adding Hardpoint weapons and pilots (listed below). It has Armor which allows it to cancel ALL hit results. Arsenal 2 allows it to attack with two of it’s weapons, and it has Weak Point 1: Rear which if the attackers unit leader is inside the rear arc, that attack pool gains Impact 1. It has a health pool of 11 and a resilience threshold of 8, rolls white defense dice with surge to block. It needs to be kept in mind that FFG has changed the vehicle damage rules as of recent, which certainly helps vehicles in someways. I would reference the Rules Reference to learn more about that! Now for it’s attack, it has the MS-4 Twin Blaster Cannon which is range 1 to 4 with two red, two black, two white….no surge to hit. However! Later this month, the tank comes with a new pilot which is pretty big for the AT-ST, and we’ll go into that after the Hardpoint options. OH and if all else fails and you find yourself in some melee, it rolls four red with it’s every so scary named Fence Cutting Blades! (Four red dice is no joke, though.) Keep in mind, the AT-ST can go into melee, but it cannot be engaged! (Surprised it doesn’t have Weak Point: Ewoks)


AT-ST Hardpoint Options

88 Twin Light Blaster CannonAT-ST Mortar LauncherDW-3 Concussion Grenade Launcher

All in all, the hardpoints don’t really cost that much. I would think you run it with the Twin Light Blaster Cannon, most of the time, and maybe the Mortar Launcher to possibly counter snipers. For 20 points the Twin Light rolls one red, one black, one white at range 1 to 3, it is Fixed:Front with Impact 1. For 10 points the mortar rolls three whites, Fixed:Front and it is Suppressive at range 4+ which is pretty big. If you can land some hit’s you’re handing out 2 suppression in the opponents backfield. Last but not least the DW-3 Concussion Grenade Launcher  costs 15 to roll two black, with Blast at range 1 to 2 Fixed:Front. Still relatively cheap, and maybe you take it if you expect your AT-ST to get close, but I still think the other two might be a better go to. 


TX-225 GAVw Occupier Combat Assault Tank

Assault Tank

The TX-225 GAVw Occupier Combat Assault Tank is a mouthful, so we’re just going with “the tank” or as some folks on the interned love to call it “the snow blower” as it may be a good use to transport Snowtroopers into the action. As long as the name is, there is also a lot to take in here. The tank has Armor, similar to the AT-ST it blocks all hits that are not crits. It has Arsenal 2, which as we know allows it to shoot two different weapons. It has a very new keyword of Transport 1: Open, which allows it to transport 1 friendly trooper UNIT. Keep in mind a few things for Transport: if the tank suffers any kind of wound, the unit transporting suffers 1 wound. When transporting, if you move the tank twice, the unit inside can only spend one action to disembark as opposed to disembarking and getting another action had the tank moved once. I’m pretty sure I have that correct, but I’m also not the best when it comes to interpreting new rules. It has Weak Point 1: Sides which gives the opponent Impact 1 when attacking it from it’s side arcs….which are quite big. It has a health pool of 8, a resilience level of 6, and rolls red dice for saves with no surge. On top of the addable hardpoint weapons, it has it’s Forward Twin MK 2 E/W Cannons which rolls a red and a black at range 1 to 2 with Suppressive while being Fixed:Front. It also has the Lateral Quad MK2 2 E/W Cannons which gives the tank a great 1 to 4 range weapon of two red, two black with Impact 2 and Fixed:Front. You can add a pilot and a hardpoint, as well as comms, but let’s dive into the hardpoints below.

The Tank Hardpoint Options

DLT-19 Rifle PintleRT-97C Rifle Pintle

As always, the DLT-19 find it’s spot in an Imperial unit. At a cost of 18 you get two red dice at range 1 to 4 and Impact 1.Very standard for a DLT and ever so efficient. Next option is the RT-97C Rifle Pintle, which gives you some extra dice with one red and three white and no keywords. It is four points cheaper, I guess it really comes down to if you think Impact 1 and just two red dice are worth the extra four points, which most of the time I’d have to say the DLT is the way to go. It’s proven efficiency, especially for it’s points cost.


Imperial Ground Vehicle Pilots

General WeissImperial Hammers Elite Armor PilotFirst Sergeant Arbmab

I decided to bunch the pilots up here since they work for both vehicles. General Weiss comes with the AT-ST and for 10 points, he’s exhaustible to give the AT-ST Arsenal 2…which would stack with it’s inherent Arsenal 2 and give you Arsenal 4. So if you fully load it up, you can shoot a lot of things or something with a lot of dice. Prior to the tanks upcoming release, you probably did just that. However! The tank comes with two new pilots that are both pretty good options in general, but one specifically helps the AT-ST and the tank the most in my opinion. The Imperial Hammers Elite Armor Pilot gives Imperial Ground Vehicles surge to hit for 10 points. I don’t want to say this is an auto include, but it’s pretty close. The only reason it’s not an auto include is because the First Sergeant Arbmab is actually good as well, and cheaper at 5 points. It gives Imperial Ground Vehicles Tactical 1 which allows you to gain an aim token after a standard move, which is really strong if you want to move and shoot. I would think that the Hammer Pilot goes on the AT-ST most of the time, and then it’s a debate for which pilot you take on the tank. Both are great options. Sorry, Weiss.


Final Thoughts

Surprisingly so, all of the units we went over here are pretty viable. They may not be optimal, but they are viable. I think the tank is going to really shake things up because it appears to be the best vehicle worth taking on either side. I think FFG is doing a good job to try and make vehicles good in the game, which in turn could bring use of some Ion and Impact weapons if vehicles start to appear more often on the table. That said, I still think the Rebel Trooper Ion and Snowtrooper Ion guns still sit in the dark corner of your closet because they just both stink, but to each their own!  Sorry for the delay on the post, but I just couldn’t compete with those Shoretroopers and Dewbacks. My oh my do those look amazing. They might be enough to get me to switch from Rebels to Imperials….until Clones come out. Man, this game is the gift that keeps giving! Enjoy it!

May the Force be with You!

-GrandAdmiralThrawn

Boba freakin’ Fett

Imperial Analysis

Image result for boba fett

“He’s no good to me dead.” – Boba Fett

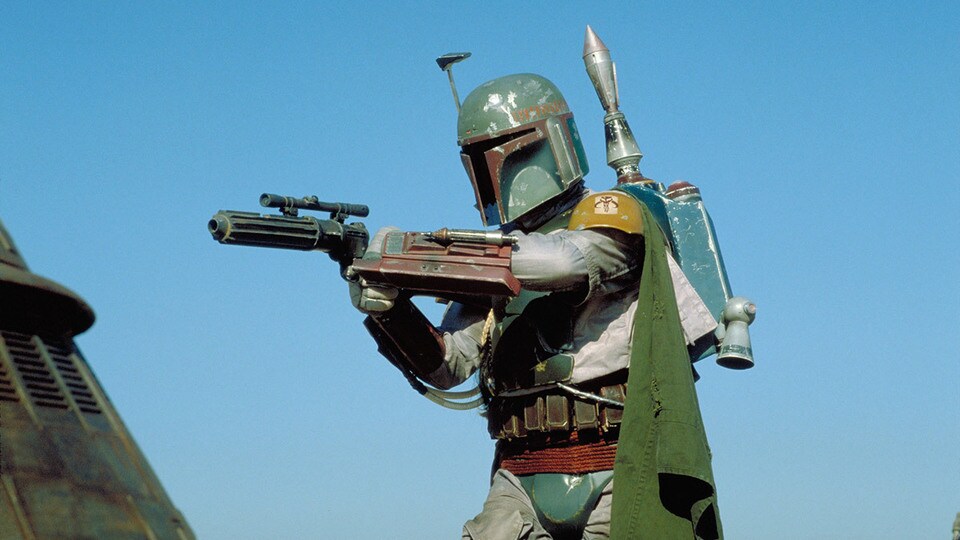
The title of this post has a double identity: as Star Wars fan, it’s amazing that Boba is a big part of Star Wars Legion/is an awesome model…as a Rebel player, man I hate that guy. All jokes aside, as much as I loved Luke and Han growing up, Boba was always a personal favorite. As he has been for most of us. Coming over from Imperial Assault, where he is unplayable competitively, I find it fascinating that Boba is great in Legion. Bossk is on his way as the second Imperial Operative, but I’m going to wait for his actual release to go over him. For now, let’s talk about our Mandalorian armored friend.


Boba Fett

So Boba doesn’t come cheap at a base cost of 140 points, and you more than likely want to run him with Hunter, Emergency Stims and maybe Recon Intel to get him into the action even more quickly. That puts him at 156 points loaded out that way, but when I say he earns every one of those points, I mean it. He has a health pool of 5 and a suppression threshold of 3. He rolls red defense dice, that Mando armor!, with surge to block. On top of that Boba has the keyword Impervious which allows him to roll extra defense dice in coordination to whatever unit is attack hims pierce value. Example, if Luke attacks Boba with Pierce 2, Boba rolls two extra dice. In terms of mobility, Boba is moving with the rarely used three speed template and Jump 2, which allows him to ignore terrain height 2 or lower. Next his attack has Arsenal 2, which let’s Boba combine two of his weapons, if able, or perhaps split his attack. Whatever seems suitable. Always keep in mind that weapon keywords are per the dice pool, which will help you in your decision making! His baseline weapons are: Boot Spikes in melee with two red. Wrist Rocket at range 1 to 2 with two black dice, Impact 1. And his EE-3 Carbine, which is two black with Pierce 1. Boba has even more options than that when you combine his Command Cards in, but we’ll get to that after. Last but not least, Boba comes with the keyword Bounty. Bounty read as follows: After set up, place a victory token on an enemy Commander or Operative. If you defeat a unit with a victory token, move that token to you. At the end of the game, if you have a victory token, gain that token. First of all, this is so thematically amazing. It adds a completely different element to the game, and as a Rebel player it always seems like you need to gameplan around that token. Just a few notes as a new player: Boba only receives the token if he serves the final blow and he only keeps the token if he survives until the end of the game.

Command Cards

Whipcord Launcher

Whipcord Launcher has a multitude of uses. Mainly, though, it’s a melee deterrent.(As always, looking at you Luke Skywalker) You get to choose an enemy trooper unit at range 1 and in line of sight, which in turn gives them 2 immobilized tokens and 2 suppression tokens. On top of that, let’s say you brought said unit into melee with Boba the previous round, Boba doesn’t need to withdraw. He can move freely with his normal speed and still have his normal actions. As a 1 pip card, it’s very, very strong. You’ll need Boba up in the fray to get it off, but that typically isn’t a problem.

ZX Flame Projector

Speaking of getting into the fray, same goes for the ZX Flame Projector. It gives Boba another weapon for the round, which is one red dice for each model in the unit you’re attacking with Blast. Depending on what you’re shooting at, you can add in the wrist rocket to add Impact 1 or the carbine with Pierce 1 to the attack, if you wanted. You could always split fire, as well! The Flame Projector just gives Boba yet another tool to his arsenal….pun intended.

Z-6 Jetpack Rocket

Speaking of adding to the arsenal….How about another weapon? Sure? Alright. The Z-6 Jetpack Rocket gives Boba three red dice, at range 3 to 4, Blast and Impact 2. So you need to keep in mind that Boba needs to use this for opponents at least range 3 away, and if they are range 4 away you won’t be able to pair it with any other weapons. That said, it’s a pretty good early card to drop down and get some early wounds on some units. Maybe even a Round 2 usage where you can add his Carbine in at range 3 and hit a unit with three red, two black with Blast, Impact and Pierce. 


Final Thoughts

Boba brings it all to the table. He’s a multi-tool facet that the Empire can use in many ways. He can kill things, he can hop over terrain, he moves fast, he can play objectives really well, he doesn’t die easy….the list goes on and on. He’s one of the best pieces in the game with his versatility. You can either send him up the gut for an objective say Recover the Supplies. If he gets that box early, he’s off and running. I know a lot of Imperial players tend to use him as a flank unit. Of course, you can always focus on his Bounty as well but that should be more of situational thin rather than a focal point, I think. Either way you use Boba, you’ll get your moneys worth is my bet.

May the Force be with You!

-GrandAdmiralThrawn

Imperial Special Forces as a Beginner

Imperial Analysis

Now that Adepticon has come and gone, and I hope you all tuned in to the great live stream Fifth Trooper put together, it’s time to get back to writing for us beginners. We’re on to the Special Forces on the Imperial side of things. Since I already did a Rapid Reaction to the Death Troopers I’m going to omit them from this post and focus solely on the Scout Troopers and Imperial Royal Guard. Both of which are staples in a lot of Imperial lists. I’m looking forward to the data collected from Adepticon and for Orkimedes at Never Tell Me the Odds to give us an in depth look at things. That said, let’s look at the basics here at the Jedha Journal.


Scout Troopers

The Scout Troopers are very similar in some ways to the Rebel Commandos with keywords like Low Profile, Scout 1 (Rebels are Scout 2) and Sharpshooter 1, oh and white defense dice! Not to mention, they are all costed the same at a 60 base(for the full unit, but you’ll most likely take the strike team) and the heavy weapons are also the same cost. Not a common theme among the Rebels and the Imperials, as the Rebels are typically cheaper. As for the Scout Troopers, they’re actually not…as good as the Rebel Commandos? I question it because I don’t know all the math behind it but there are some things that make the Scouts a little hampered down compared to the Commandos. Such as the fact that Scouts only have a range of one to two as opposed to one to three and the fact that they don’t sure on offense and the Commandos do. If the Scouts get into range they can be really deadly though because they roll two black per miniature in the squad, sniper included. The likelihood you see full Scouts is not as likely as much as you’ll see strike teams. Let’s look into that.

Strike Teams really are the bread and butter to any list building. It’s hard to deny their effectiveness and price point. If activation count didn’t matter, Strike Teams probably don’t matter as much. But, the game relies on activation count and here we are. You’re either looking at a cost of 44 points for a two man sniper squad, rolling two black with no surge, or a point cost of 42 for a two man Saboteur squad, rolling one red and one black with surge to crit, blast and suppressive. The last keyword is quite important. Imperial Sabs roll a red and a black with Suppressive which will, in hindsight, more than likely put two suppression on any unit within range of that sonic charge. After playing with some Saboteurs this week, and the success of Saboteurs at Adepticon, I really think it’s something I am going to test out some more! That said, Sniper Strike Teams will be something you will see in droves in the competitive world of Legion. If you’re playing for fun, no need to worry about that and build whatever Scout units you want! They’re honestly some of my favorite models in the game, I think they look really cool. Always have since Return of the Jedi!


Imperial Royal Guard

Imperial Royal Guards

Palpatines thugs in red armor are a very unique unit in the game. At a base point cost of 75 points you get three Guards, each with a health pool of 2, and they all collectively have a suppression threshold of 2. They move at a speed 2, have Charge, Disciplined 2, and Guardian 2. All of those key words are very important in how you want to run what we call the IRG. Charge allows the IRG to get into range and use their next move to get into melee and still attack. Disciplined 2 almost ensures they get both actions because when you’re issued an order you take two suppression off. As for Guardian 2, this is where the IRG probably has it’s most value. We went over Guardian with Chewbacca but let’s reiterate what it does. While a friendly trooper at range 1 and in line of sight is defending against a ranged attack, you may cancel up to two hit results. For each result cancelled, roll 1 defense dice. Convert any surges, then suffer 1 wound for each blank. This will allow you to take some wounds off units you don’t want to take wounds at that moment. A great way to use them is to protect Palpatine, Snipers in the early rounds, and perhaps Snowtrooper units who need to move up the board to get in to range. Keep in mind that they roll red defense dice, however they do not surge. As for offense, they pack a pretty good punch. At range, they’ll be rolling two black dice for every IRG model in the group. In melee they roll one red, one black per miniature. No surge on offense, either. However, they do have an upgrade which you’ll want to consider!

Imperial Royal Guard Heavy Weapon Upgrade

Electrostaff Guard

If you’re primarily using the IRG for defensive reasoning you may not bring the Electrostaff Guard. However, if you’re using them to get up into the fray and get into melee, he’s your guy. Especially if you want to run up into a Lightsaber wielder, looking at you Luke Skywalker, because the unit gains Immune: Pierce when the Electrostaff Guard is in the unit. Rather than rolling the red/black dice pool, he adds two black dice instead. A possible upgrade to bring with the fully loaded out Royal Guards is Tenacity. Odds are they’ll take some wounds, adding in another red dice into their melee pool is pretty darn good!

Final Thoughts

Special Forces on both sides of the game are honestly great all around. Between the Strike Teams, the Imperial Royal Guard and now the Death Troopers, the Empire has a plethora of Special Forces possibilities. You can actually run a five Special Forces list if you desire to run Palpatine and Krennic together as Commanders with use of the Entourage keyword. Might not be a very effective, competitive list….but man it sounds like a lot of fun! The best part of Star Wars Legion is that list building is tough! There’s so many viable units, it’s hard to figure out what you want sometimes. And if you ask me, that’s just great.

Congrats to all the winners at Adepticon this past weekend, and good luck at Worlds in June!

-GrandAdmiralThrawn